

In real estate, first impressions are everything.
As a real estate agent, you know the power of a well-presented property. And you also know that staging can be really expensive.
But what if there were a way to enchant potential buyers and show a property's potential without moving a single piece of furniture?
There is: It’s called digital staging. Digital staging allows you to stylize properties to look any way you choose with only a few clicks. You can stage the same room in different ways to show various styles or uses.
Digital staging can transform your listings and attract more views. Generate more offers and sell your properties faster and for more money by learning how to effectively digitally stage your properties. Let’s get into it.
How to Digitally Stage Your Property
Your first step is to decide if you would like to roll up your sleeves and digitally stage properties on your own, or if you’d like to hire a professional digital stager instead.
If you want to go it alone, we've got your back. Here are a few tips on how to do the digital staging on your own:
Choose the Right Software
Start by selecting the right digital staging software. Platforms like Virtual Stager or RoOomy offer user-friendly interfaces and a variety of furniture and decor options. Opt for a tool that fits your technical comfort level and staging needs.
Here’s what to look for:
1. Features and Flexibility Choose software that offers a wide range of furniture and decor options. It should allow you to change items easily and adjust elements like lighting and shadows to make images as realistic as possible. The ability to view different layouts and design styles can also help tailor your staging to appeal to various buyer tastes.
2. Ease of Use Opt for a user-friendly platform, especially if you are not highly tech-savvy. Look for intuitive interfaces with drag-and-drop features that simplify the staging process.
3. Quality of Graphics You want your digital staging to look as real as possible. High-quality graphics make the staged photos look more believable and attractive. This is what will attract potential buyers.
4. Pricing Digital staging software can range from subscription-based models to pay-per-photo pricing. Prices might vary widely, from about $15 to $150 per image, depending on the quality and complexity of the designs. Some platforms may offer packages or subscriptions which can be more cost-effective for frequent use. Evaluate the pricing structure to find something that matches your budget and frequency of use.
5. Support and Resources Good customer support can be invaluable, especially when you encounter technical issues or have questions about the software. Additional resources like tutorials, FAQs, and community forums can also help you get the most out of the software. If all else is equal, look for the platform that gives you these additional resources.
Should You Hire a Professional Digital Stager Instead?
If all of the above seems daunting or too time-consuming, it might be a better option to hire a professional. Here’s what to consider:
Research Reputable Companies - Look for companies with good reviews and a strong portfolio. Companies like BoxBrownie, Spotless Agency, or Virtual Staging Solutions may be good options to consider.
Check Their Portfolio - Review their before-and-after pictures to ensure their style aligns with what you’re looking for.
Know the Costs - Professional digital staging can range from $30 to $150 per photo, depending on the complexity. Choose the option that best fits your marketing budget.
Turnaround Time - Ask about turnaround time. Quick turnaround time is one of the benefits that professional digital staging services offer. Turnaround time can be as quick as 48 hours, which is much faster than arranging physical staging.
Which Should You Do?
If you're just starting, experimenting with DIY digital staging on a low-stakes listing could be a valuable learning experience. However, if you want to minimize risk, lean on the expertise of a professional who can offer top-notch results without the steep learning curve.
Decide on the Format
Should you digitally stage as images, videos, virtual tours, or all of the above? Here’s what to consider:
1. Photos High-resolution images are the most basic output of digital staging, but also the most flexible. They can be used in all your online listings and can be featured in printed brochures or flyers. Ensure the photos are optimized for both web and print to maintain quality across different mediums.
2. Videos Some staging software allows you to create a digital walk-through video of the staged property. Videos can be particularly engaging. They show potential buyers the flow of the property as they move from room to room. These are excellent for sharing on social media platforms like Instagram and YouTube, and can also be embedded on your website or shared in emails.
3. Virtual Tours Virtual tours, particularly 360-degree tours, are becoming increasingly popular for property listings. They allow potential buyers to explore the property from every angle. This offers a more interactive experience than static photos or videos.
Best Practices for Digitally Staging a Real Estate Property
Whether you choose to DIY your digital staging or hire a professional to do it, here are a few best practices to keep in mind or pass on to your digital stager:
Always disclose: Be sure to be transparent about your use of digital staging. Always be sure to disclose any alterations made to images in the listing details.
Letting buyers know that the images have been digitally enhanced to show potential improvements can help maintain trust and avoid any accusations of misrepresentation.
Take high-quality photos of the property - The most important step is to take quality, high-resolution photos of the property so that you or your hired stager has a good foundation to work with.
Schedule photo shoots during the day when natural light is abundant. Open curtains and blinds to let in as much light as possible. Set up your tripod and use it to avoid blurry images. Capture each room from the corner or doorway to get the widest perspective. This angle typically shows the room's depth and makes it look more spacious.
Choose the right rooms to stage - Not every room needs to be staged. If you’re working with a limited budget, prioritize key rooms you think will make the biggest impact on your potential buyer.
Not sure which rooms to stage?
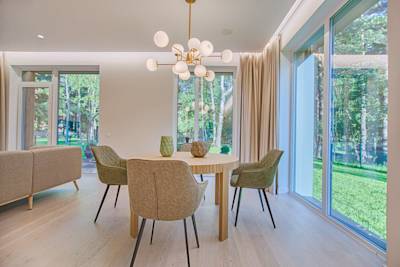
The living room is always a safe bet because this is often the first room that potential buyers will see when they enter the home. It sets the tone for the rest of the house. Then there’s the kitchen, which is the heart of the home. A well-staged kitchen can significantly boost a property’s appeal. Finally, there’s the master bedroom, which should look serene, cozy, and inviting.

Declutter the space - Make sure each room appears neat and spacious by removing unnecessary items in the digital model. This will create a sense of spaciousness and cleanliness.
Digitally remove any unnecessary furniture and personal items that can make the space look crowded. This includes things like excessive decorations, personal photographs, or any bulky furniture that disrupts the flow of the space.
Keep it neutral - To appeal to a wider group of potential buyers, apply a neutral color palette to the walls and decor. Neutral colors include beige, gray, or off-white. Avoid loud patterns or bold colors that might reflect specific personal tastes.
Highlight key features in the space - Focus on and accentuate architectural features that excite buyers. This includes fireplaces, large windows, or high ceilings. Arrange furniture to draw attention to these features. Place a stylish sofa facing the fireplace, or use sheer curtains to showcase large windows.
Create curb appeal - Don’t forget about the exterior of the home. Small edits can make a big difference. Be sure to beautify the landscaping, but do so responsibly. When digitally enhancing the exterior of a home, avoid adding major structures like mature trees or fences, which could drastically alter the appearance of the property.
These additions can create an end result that's difficult to achieve in reality and might lead to disappointment during actual viewings. The goal is to enhance the property's appeal without misleading potential buyers.
Light up the space - Proper lighting can make a room look more spacious and inviting. Digitally enhance windows to simulate the effect of natural light flooding the room, which can make spaces feel airier and larger. Soft, warm lighting can make a room feel cozy and welcoming, so consider this when adjusting the light settings digitally.
Show the possibilities - Offer a few different furniture arrangements in your digital staging to show how the room can serve multiple purposes, such as a guest room that can also be a home office.
Stage the outdoor spaces - Does your space have balconies or patios? If it’s usable real estate, it can be staged. Show potential buyers how they can use these spaces, too. Add attractive outdoor furniture settings, such as dining sets, lounge chairs, or hammocks, to illustrate how one can enjoy these spaces.
Incorporate plants, flowers, and even string lights or lanterns to create a charming and inviting outdoor atmosphere. Highlight the functionality of the space, like an outdoor kitchen area, a fire pit, or a cozy reading nook, to spark ideas for use.
Add art - They say a home without art is soulless. Don’t let your staging be soulless. Choose art that complements the room without personalizing it too much. Abstract pieces, landscapes, or classic prints can enhance aesthetics without reflecting personal taste.
Provide before and after photos - Showing before and after photos can dramatically illustrate the value added by staging and help potential buyers appreciate the property’s potential. Remember you’re not trying to catfish the buyer because eventually, they will see the property as is. You’re just helping them see the possibilities of the property.
Final Thoughts
Digital staging is a fantastic way for real estate agents to present properties in their best light without the heavy lifting and expense of traditional staging. With the above tips, you can now enhance your listings’ appeal and captivate potential buyers from the first glance. Good luck with your listings!